Get Requests Online
Collect day off and vacation requests from your residents and staffs via the Schedule Viewer.
To collect requests for days off from the Schedule Viewer:
- Residents and Attendings and Staff must be added to the system.
- Publishing must be enabled on your account with password protection enabled. Please see this page.
- Day-Off and Vacation Requests Gathering must be enabled (see below)
Enable Requests Gathering
To enable requests gathering navigate to the Settings tab under the Residents/Staff section.

Find the section on the page called Request Publishing and Gathering:
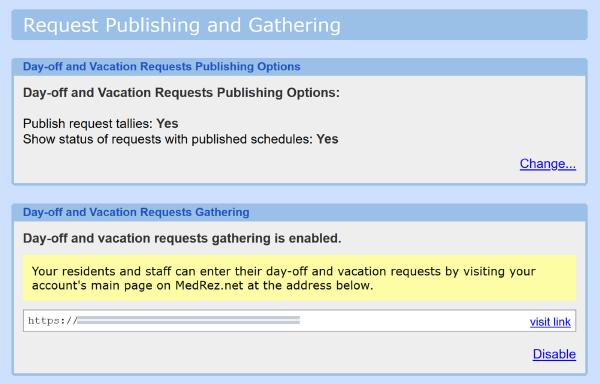
The second box is “Day-Off and Vacation Requests Gathering”. Click the “Enable” link (if it’s currently disabled) to change the setting.
Set Request Data Visibility
While you’re at it you may want to set visibility of request data, which are set in the first box of the screenshot above.
If you “Publish request tallies” each resident’s totals of days requested off and days granted or denied will be visible to all other staff and residents in the Schedule Viewer.
If you “Show status of requests” each published Call/Shift Schedule will be accompanied by a list of relevant requests for time off. This is handy for residents to see if their requests were granted. However some programs prefer to not show every request made and granted to each staff.
Requests can be viewed by other residents and staff who have access to the Schedule Viewer even with these settings disabled because they are listed under the resident’s individual page.
Tell Residents To Enter Their Requests
After enabling Online Requests Gathering point your residents to the web address that is given. This is the same address that residents and staff can visit to see their schedules.
From there, they can find their name in the listing of residents and staff and enter their requests.
Manage Incoming Requests
After they create a request the system will highlight the fact that there are new requests available for you to review in the Requests tab:
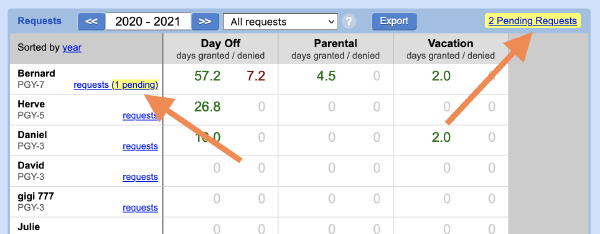
Click on that “New or Changed Requests” callout to open the incoming requests dialog:
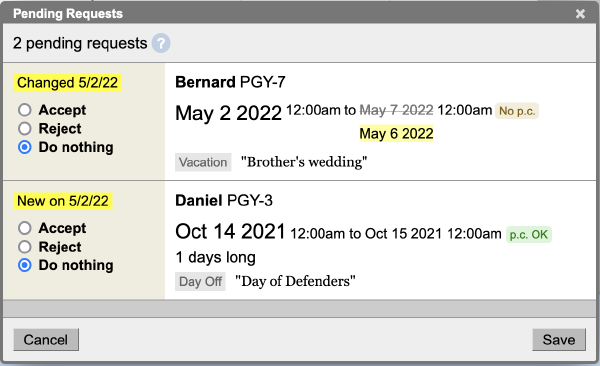
Here you can see two incoming requests, the first of which is a change to an existing request.
You can take one of three actions on each incoming request:
Accept
“Accept” a new request (or a change to a request) if the request is reasonable and you plan to work that request in the schedule. An “accepted” request will become part of that resident’s requests list and will show up in relevant schedules. Even though the request has been “accepted” you will still have the opportunity to “deny” that request if it can not be worked in the schedule.
Reject
“Reject” a new request if it is unreasonable, if it was made too late, is in error, or it breaks one of your organization’s rules for example. The request will not be added to this resident’s list of requests. “Reject” a change to a request, or a deletion of a request if the Request has already been worked into the schedule and it is too late to change, for example. The original request will be kept, and the resident will be notified in their “Manage Requests” window in the MedRez.net Schedule Viewer.
Do Nothing
“Do nothing” if you are unsure and you don’t want to commit. The request will continue to show up in this dialog until you either reject or accept it. You might “do nothing” until you have had the time to discuss the situation with the resident/staff.
A request appears as “Pending review” in the Schedule Viewer so long as it has not been accepted or rejected.
After Accepting Requests
When you “accept” a request it is added to the list of requests for that resident and can be managed like any other request. See Manage Off Requests for complete details.