Make Your Call/Shifts Schedule
The Schedule editing page is where you’ll spend most of your time. Let’s have a look at what it offers.
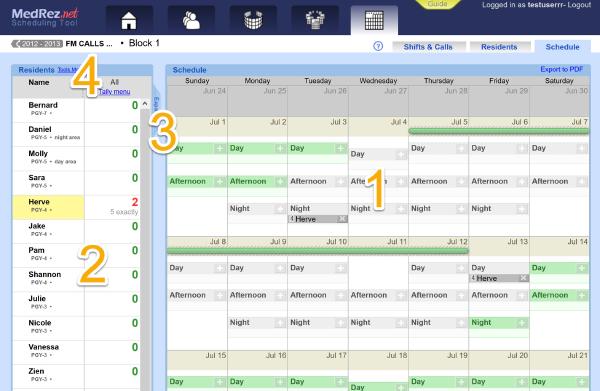
In the numbered screenshot above, you can see the schedule area (1), and the residents/staff list (2). The staff list expands into a “stats” table when you click the “expand” tab (3).
Finally, there is the “Tools menu” (4), which is where the Fast Fill, Randomizer, and publish functions are hidden.
Make your schedule
The most basic way of working on your schedule is as follows:
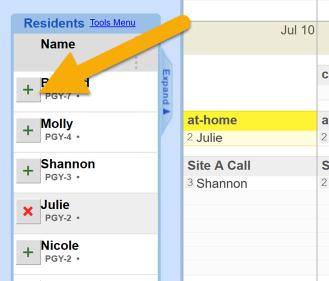
- Click on a resident or staff in the staff list to select them
- Click on the ‘+’ button of a shift to add them there
- Or click on the ‘×’ by their name in a shift to remove them
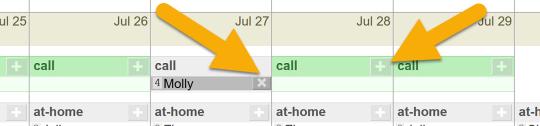
Similarly you can click on a shift to select it (click on the name of the shift to select it) then click the ‘+’ or ‘×’ buttons next to the names of residents and attendings to add or remove them.
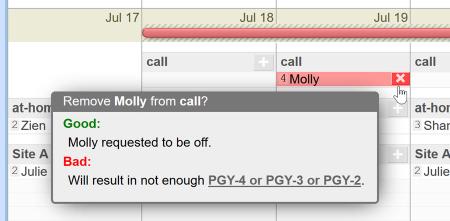
In both cases when you hover over either a ‘+’ or a ‘×’ button, a popup window shows you the “pros” and “cons” of adding or removing that resident. See the image below.
Visual Aids
There are other helpful visual aids in the schedule editor, particularly when a resident is selected:
Not-On-Schedule Indicator
A resident can be available to work in a schedule for only part of the duration of the block. When that happens the part of the schedule that the resident is not on is “hashed” out in the calendar. See below:
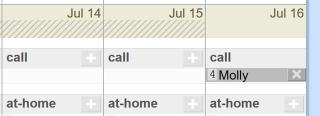
In the image above Molly is not on the schedule on July 14 and 15th (notice the “hashed” pattern).
Day-Off And Vacation Requests Indicators
Vacation and day-off requests show up in the calendar when a resident is selected. The request color is as follows:
- Green: request granted, no conflicts
- Red: request granted, but there is a conflict (the resident is on during the request)
- Grey: request denied
Furthermore if the request is of type “vacation/leave” (as opposed to day-off), then its background is hashed, much like the not-on-schedule indicator.
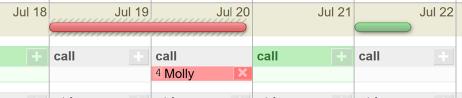
In the image above notice that Molly has requested to be off on July 19th to 20th. However since she was added (despite the warnings) to a call both her name and that request are red.
Notice as well that because that request is of type Leave/Vacation, the area behind the request is “hashed” in the same way as if she was not on the schedule.
More details on requests can be found in the Manage Off Requests page.
External Commitments Indicator
Depending on how you arrange your schedules in the MedRez.net Scheduling Tool you may have a situation where residents participate in multiple different but overlapping Call/Shift Schedules. This is perfectly fine, but you will want to make use of the following feature when making your schedules.
The external commitments indicator shows you when and where a resident or attending is working in schedules other than the current one.
The same indicator also shows you when the selected resident is working in the previous and subsequent block helping you ensure smooth transitions.
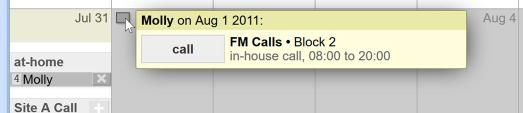
In the image above you can see the small rectangle that showed up in the calendar because Molly was working on the first day of the following block.
Place your mouse over the small rectangle to reveal the box that details all external commitments for that day.
Green Highlight For Shifts and Calls
When a resident is selected, any shift that they can be added to turn green. Put another way, any shift that isn’t green presents a problem for that resident. Either they are already working at that time, or they requested to be off, or they Tally Target has already been met, etc…
To know what the problem is, simply hover over the ‘+’ for that shift.
Red Conflict Highlights for Residents
When a resident is selected, they may be highlighted in red if their presence on that shift causes a problem. For example, if they are working two places at once, or if they asked to be off, etc…
The Stats Table
The Stats Table is where you can see per-resident statistics and results for your Call/Shift schedule.
Tallies
The first set of columns will be Tally Results and their associated Tally Targets. For more on that, visit the Counting Shifts and Calls page.
Request Stats
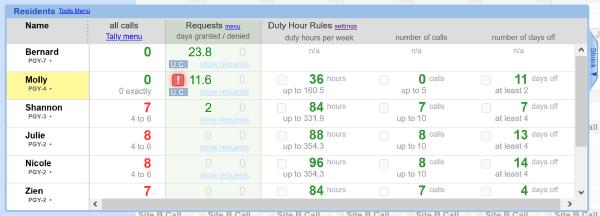
The column labeled “requests” shows you data about the requests for each resident.
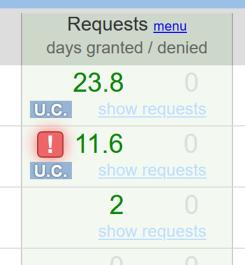
This column shows you the number of request days granted denied in this block.
If there are any conflicts with a request (like if a resident was scheduled at a time they requested to have off) there will be an exclamation mark over a red background (as in the image above).
A “U.C.” label means that some requests are “under consideration”. This means the status of the request has not been published (see the page on Managing Requests). Note that when you publish the schedule, all “under consideration " requests become “status: published”.
Duty Hour Stats
Three stats are shown for duty hours:
- Duty Hours per week
- Number of Calls
- Number of days off
For each stat, the system shows you:
- The stat in green (or red if outside acceptable range)
- The maximum number to avoid violating duty hour rules (or minimum in the case of days off)
To understand where that second number comes from place your cursor over the little square.

In each case the system will show you exactly how it came up with that number, so you can decide if you need to adjust your duty hour rule settings.
Read more about the duty hour rules system here.
Under The Tools Menu
The “Tools Menu” is located at the top of the residents list:

Fast Fill
Fast Fill lets you add or remove residents and staff from this shifts and calls of your block in batches.
Fast Fill is flexible and will let you do things like:
- Remove one or more residents from every call or shift in the schedule
- Remove every resident from every every 7am shift
- Add a resident to call from Monday to Friday during part of the block
- Add a resident to call in a Q-4 pattern
Here is what the Fast Fill tool looks like:
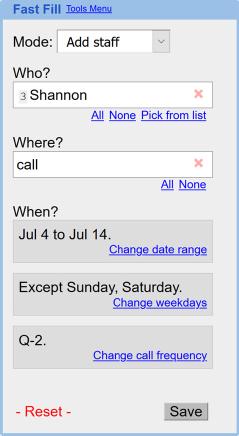
There are six inputs, let’s go through them one-by-one.
Mode
This is key! You can either add resident or staff to calls and shifts or remove them.
Who?
Pick the residents you will add or remove. You can click a resident in the calendar, or click “Pick from list”.
Where?
Click on the calls and shifts in the calendar.
The key thing to understand is that this Fast Fill will add every resident in the list to every call/shift in this list (with the exception of the three modifiers below.)
If you need to do add different resident to different calls or to different times, you’ll have to use Fast Fill multiple times.
When?
This defaults to the entire block, but you can select a different period of time within the block.
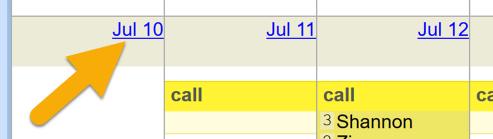
Click “change the date range”, then click the first day of your desired time period, then the last day. (The days become clickable links when you are expected to click on them.)
Days Of The Week
Select days of the week that should be affected by this Fast Fill operation.
Let’s say you want to add some residents to a call Monday to Friday for the entire block, but not Saturday and Sunday. You would click “Change weekdays” and deselect Saturdays and Sundays by clicking on any Saturday and Sunday in the calendar.
Call Frequency
Call Frequency lets you select days based on a Q-2 (every other day) Q-3 (every third day), etc… pattern. Click “Change call frequency” and pick the frequency and click on a day in the calendar to set a day that should be included.
You can use all of the above capabilities together to handle almost any situation. As you use the tools, you will get a preview of what Fast Fill do when you click “Save”.
Randomizer
The Randomizer has its own page, please read it here.
Publish
Publishing your Call/Shift schedule is covered in the Publishing Section