Automatically Generate Your Schedule
The Randomizer fills your Call, Shift, or Clinic Schedule with residents while respecting duty hour rules, day-off requests, staffing requirements, Tally Targets, etc…
Understand the Basics
Types of schedules
Some schedules lend themselves well to using the Randomizer, others do not. Here are some types of schedules where the Randomizer will work well:
- Emergency Medicine shift schedules, and similar. ✓ good
- Call schedules that do not follow a predetermined pattern, like Q-4. ✓ good
- Schedules where you are trying to fit residents or attendings in time slots while working around their other commitments. ✓ good
The Randomizer only adds
The Randomizer only adds residents to the schedule. It does not remove anybody, or move them around.
If you have a few residents already on shifts or calls in the block, and you run the Randomizer, it will not remove those residents from those shifts. It will not alter what was already there in any way.
While this gives rise to advanced usages (see below) it can also confuse first-time users: after running the Randomizer and saving the results, if you change your mind and want to run the Randomizer again you have to empty all those shifts (use Fast Fill for that).
Before Launching the Randomizer
The Randomizer works by examining every aspect of your call/shift block. Anything missing or incorrect will cause the Randomizer to produce poor results. Make sure the following has been input correctly:
- Duty Hour rules have been adjusted for your situation. See the duty hour rules page.
- There is an appropriate roster of residents available to work in the shifts and calls. See how to include Residents in your schedule.
- There is a set of calls and/or shifts in the schedule. Read creating your shifts and calls.
- Each time slot has correct staffing requirements. Read about in the shifts and calls page as well.
- Tallies and Tally targets are helpful to get the right proportions of shifts distributed to each resident. See the page on counting shifts and calls.
Basic Usage:
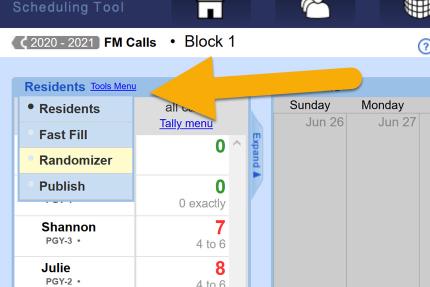
Launch the Randomizer from within the schedule editing tab. To do so, select the Randomizer from the “Tools Menu” (see below).
Click “Launch Randomizer” to start the process. You will see progress bars hinting at the progress the system is making at creating a schedule that meets your requirements.
The process can take several minutes. The system will try to fill your schedule, and will keep trying different things to get as close to a good schedule as it can.
You can leave the schedule edit page, and you can even log out of the Scheduling Tool. Results will be there next time you load the page.
When the Randomizer is done, you can save the results or discard them. To keep these results and make them part of your schedule click “Save Results”, otherwise click “Discard”.
Making the Randomizer Work for You:
Using the Randomizer is very simple, however a good understanding of how it works is essential to generate good schedules.
There are two main factors that drive how the Randomizer adds staff to Shifts and Calls:
- Each staff’s Tally Targets, which tell the Randomizer how many Shifts/Calls of different type each resident should take.
- Each Call / Shift / Clinic’s Required Staffs, which tells the randomizer how many PGY-2s and PGY-3s to put on each Call / Shift (for example).
The steps to take to get the Randomizer to create good schedules are as follows:
- If you have not done so already, create at least one Tally. If you have a very simple schedule create a Tally that includes all the Shifts or Calls in your schedule. More information on creating Tallies is available here.
- Set reasonable Targets for the important Tallies for each resident. If you have a Tally that counts all shifts for example, it would be a good idea to set a minimum number for that Tally. Help adjusting Tally Targets is available here.
- Go through all your Calls / Shifts / Clinics and ensure that the staffing requirements are set appropriately. You must tell the software how many residents you need in each Call / Shift. Staffing Requirements are set in the Shits & Calls tab, described here.
With the three steps above completed the Randomizer should be able to create a schedule for you. Depending on your needs, your standards for a good schedule, and how tight your requirements are the Randomizer may be able to create a schedule that can be used without further modification.
If you feel the schedule generated by the Randomizer is not good enough but you don’t want to change any of your Tally Targets you could re-run the Randomizer two or three times. Each run of the Randomizer will produce a different schedule, so there is a chance you will get a better one.
Remember that the Randomizer only adds residents and attendings to shifts and calls.
If you save the results of the Randomizer and then decide to re-run it, use the Fast Fill function to remove residents from your Calls and Shifts before re-running.
If you need to fine-tune the schedule created by the Randomizer, save the Randomizer’s output (“Save Results”), then return to the Residents list and use the software’s manual schedule editing functions to fine-tune your schedule.
More Advanced Usage
Make Progressive Shift Schedules
If your schedule has shifts with multiple start times each day, the “Progressive Shift Schedule” option will try to make residents follow a progression that is friendlier to their circadian rhythm.
In an progressive schedule a resident works in the morning, then mid-day, then evening, then does a small number of nights, then they get a few days off.
The system does its best to follow that ideal pattern when the option is enabled, but it is naturally subject to all the other constraints of your schedule.
To enable the Progressive Shifts Schedule option, go to the settings tab for your schedule, and enable it there. You can also set the desired number of rest days between the end of night shifts and the next morning shift.
Pre-Filled Schedule
Since the Randomizer only adds to the schedule, a common practice is to add residents to the schedule in the shifts and calls manually for the cases where you know that a given resident or attending need to be in a specific call or shift.
Then you can run the Randomizer “on top of” this partial schedule to get a mix of strict pre-determined and randomized schedule.
Troubleshooting:
The Randomizer does not add anybody to any Shifts or Calls.
Make sure to set a lower Limit to the Tallies. The “lower limit” or “minimum” is the number that is going to cause the Randomizer to give that resident more shifts. The “minimum” is the left box when you set the limit. After saving the Tally Targets, the grey text that describes the Limit should read as follows:
- “At least 12” ✓ good
- “12 exactly” ✓ good
- “11 - 12” ✓ good
But not:
- “Up to 12” ✗ No minimum value, so the Randomizer has nothing to do
If there is no lower Limit or “minimum” and that resident may not get any shifts.
Similarly, make sure your Staffing Requirements have a minimum value for number of residents. For example:
- “1 PGY-4” ✓ good
- “1 or 2 PGY-4 or PGY-3” ✓ good
But not:
- “0 to 2 PGY-4” ✗ Minimum is zero, so the Randomizer has nothing to do
If your Staffing Requirements do not have a minimum number of residents, there is no incentive for the Randomizer to add anybody to this shift because “zero residents” is an acceptable staffing situation.
The Randomizer reports that some shifts “could not be filled”.
A shift that could not be filled is one that has a minimum number of required staffs set but that requirement could not be met. This happens when the Randomizer can’t find anybody to put on that Shift / Call. All residents in the schedule are either busy at that time, on a day-off or adding them would violate an ACGME duty hour rule.
When this happens try to ensure that there is somebody available to take each of your Shifts and Calls. If too many of your residents and staff are on Day-Off request or on Vacation, you may have to deny someone’s request in order to fill that Call or Shift.
The Randomizer appears to be “stuck”.
If the progress bars for “Duty Hour Rules”, “Staffing Requirements”, etc… no longer moves the Randomizer may be looking for a way to improve the schedule but has not yet found it. If you see the “Iteration” counter change then the Randomizer is still looking for a better schedule and the progress bars will update should the schedule improve. It may take many iterations before the Randomizer manages to improve the schedule.
If the “Iteration” counter stops you may have lost the connection with the server. In that case Refresh the page. Do not cancel the Randomizer. It is likely the Randomizer is still running and refreshing the page will automatically reconnect the Randomizer.
The Randomizer does not schedule someone where it obviously should
Sometimes the Randomizer finishes and leaves unfilled shifts where it seems like it should have been able to fill the shift. This can feel frustrating, but there is an easy way to know why it did this: use the features of manual schedule editing to see what the Randomizer “saw”.
After the Randomizer runs, save the results and return to regular schedule editing mode. Click on the shift that went unfilled and look through the list of residents. If the Randomizer didn’t fill the shift, none of the residents and attendings in the list of staff will show up green.
Hover over the ‘+’ next to a resident to reveal the popup that will indicate why the resident could not be added. This should hint at what you can change to make the Randomizer work better for you.
The Randomizer gives some residents more shifts than others
The balance of shifts and calls the Randomizer assigns to each resident is guided by the Tally system, and more specifically Tally Targets. If you find that the Randomizer is not giving each resident the right number of shifts or calls, please check your Tallies:
- Is there a Tally that counts the shifts and calls?
- Are there appropriate Tally Targets for all residents?
If those look good, then it’s likely the Randomizer is unable to meet your desired Tally Targets because there are too many constraints on the schedule.
The Randomizer prioritizes respecting duty hour rules, meeting staffing requirements and not putting residents on during their day-off requests. On some schedules it’s too difficult to meet all these requirements and also meet Tally targets, so the system gets as close as it can.